Settings and Preferences
The Preferences’ dialog allows you to tune and change many aspects of the course evolution algorithm. It has sections relating to the preferred lengths of different legs of the course, what constitutes good control placement, what the preferred weightings of the different leg scoring heuristics are, preferences for the course map generation and control over the behaviour of the genetic algorithm.
These settings are discussed below.
Leg Length Preferences
These influence placement of controls by the algorithm and are used to determine what would be considered a good length for any given leg of a potential course.

Desired Average Leg Length
Mean length of a course leg, in metres This controls the number of controls that StreetO will place on a course when seeding a course.
For example, on a course with a 8K desired length, and an average leg length of 500 m, StreetO will place 16 controls on the course.
Setting this value too small, 100 m or so, will result in a course with a lot of controls and a lot of short legs. But the algorithm will be limited in its control placement options, probably leading to less than ideal course legs.
Min Leg Distance
Minimum distance between two consecutive controls on a course leg, in metres before the algorithm starts scoring this leg badly.
Max Leg Distance
Maximum distance between two consecutive controls on a course leg, in metres before the algorithm starts scoring this leg badly.
Nearest Approach to Finish
Minimum distance between anything other than the last control on a course leg and the finish control, in metres before the algorithm starts scoring this leg badly. This is primarily used to keep the course legs away from the finish position until the final control.
Max Allowed First Leg Length
Maximum length of the first leg of a course, in metres. this overrides the max and min leg lengths on the first leg of the course. This is used to prevent the first leg from being too long. Don’t particularly want to run for ages to the first control.
Max Allowed Last Leg Length
Maximum length of the last leg of a course, in metres. this overrides the max and min leg lengths on the last leg of the course. This is used to prevent the last leg from being too long. It’s generally a good idea to keep the last leg short.
Allowed Course Length Delta
How much shorter or longer a course can be than the desired course length. This is expressed as a tolerance, and is used to determine when StreetO should reject a course.
For example, if the desired course length is 8K, and the course length delta is set to 0.2, then a course in the range 8000 m +/- 8000 m * 0.2, or anything between 6400 m and 9600 m, would be seen as acceptable.
Increasing this value will give StreetO more candidate courses to work with, but will also make it more likely that you’ll be unhappy with the distance of the resulting course.
Decreasing the value gives you a more consistent course length, but gives StreetO less candidate courses to work with.
Control Placement Preferences
These influence what the algorithm considers to be a good control site based on the feature on the map at that location and how close the potential control is to other controls on the course.
StreetO will select potential control sites based on the following criteria:
- There is street furniture, a bus stop for example, at that location
- There is a road or path junction at that location
- There is an obvious bend in the road or path at that location
Street Furniture is always selected if there is any at that location. If not, the algorithm will consider the other features but, potentially, score the leg to that control site lower.

Min Control Separation
This is the minimum straight line distance in metres between this and any other control on the course that would make the location in question a valid potential control site.
Junction Score Factors
Min Average Distance between Junctions
Value is in metres. The minimum average distance between junctions with turn decisions on a leg before the algorithm starts scoring the leg complexity heuristic for the leg badly.
Junction Control Placement Score
A value between 0 and 1, where 0 is the lowest score and 1 is the highest. For the Control Placement Scoring heuristic to give to the controls placed at path, track or road junctions.
Bend Score Factors
Min Bend Angle
Value in degrees. The minimum sharpness of a bend that can be considered as a valid control placement location. Making this value too low results in non-obvious control sites on the course. It can be difficult to tell on the ground where the control actually is. Making it too high will limit the number of potential control site locations. 30 to 45 degrees or so usually works quite well.
Bend Control Placement Score
A value between 0 and 1, where 0 is the lowest score and 1 is the highest. For the Control Placement Scoring heuristic to give to the controls placed at bends on paths, tracks or roads.
Street Furniture Factors
Street Furniture Distance
Maximum radius in metres from the potential control site that the algorithm should look for street furniture to snap to.
StreetO will always prefer to place controls on the street furniture within this radius. If there is any on the map at this location.
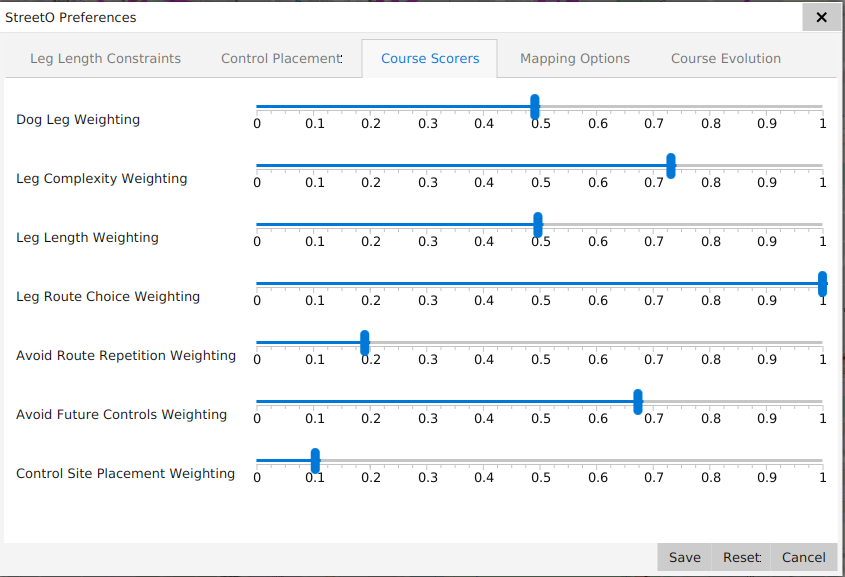
Course Scoring Preferences
These allow tuning of the importance the algorithm should give to the various heuristics it uses.
See the Heuristics section for more information about how these actually work.
These weightings determine how StreetO should calculate the overall score for a given leg These weightings are expressed as sliders in the UI. The higher the value, the more important the heuristic is. Setting all of them to 0.5 will give the same result as setting them all to 1. It is the deltas between the values that matter.
By default, all of these are set to 1. I find that something like the values shown below work well for me.
Dog Leg Weighting
How much importance to give to the dog leg heuristic.
Leg Complexity Weighting
How much importance to give to the leg complexity heuristic.
Leg Length Weighting
How much importance to give to the leg length heuristic.
Leg Route Choice Weighting
How much importance to give to the leg route choice heuristic.
Avoid Route Repetition Weighting
How much importance to give to the route repetition heuristic.
Avoid Future Controls Weighting
How much importance to give to accidentally visiting future controls heuristic.
Control Site Placement Weighting
How much importance to give to the control placement heuristic.
Mapping Preferences
These control the size, scale and appearance of the maps generated.

Map Type
Map Appearance
What Open Orienteering Map styling should be used for the map
Maximum Map Scale
What is the maximum scale that should be considered when the algorithm is applying the “Course can be printed on a Map” constraint. Setting this to a low scale factor results in an easier to read map, but can make it difficult to find candidate courses that would fit on that map if the desired course length is very long.
Map Printing Options
Paper Size
Generate an A3 or A4 sized pdf of the course.
Print A3 Maps on A4 Paper
Essentially print the map in two halves, just split down the middle. Most folks only have an A4 printer at home. This option allows you to get a better map scale by printing that course over two pieces of A4 paper.
Note: It is literally split the map down the middle, there are no ‘map exchange’ style controls. The purple lines just go off the edge of the paper.
This is always guaranteed to work, and give you a better map scale, but it can be a bit annoying when navigating legs that start on one sheet and finish on the other.
Split Map for Better Scale
This is similar to the above option, in that it prints the map over two pieces of paper. This option will place ‘map exchange’ style controls, where that control is shown on both map sheets and there are no purple lines going off the edge of the map.
However, this option does not change the paper size.
For example, if the course needs a 1:10000 scale map to fit it all onto, then it may be possible to split the course up into two pieces, and print each of those pieces on a 1:7500 scale map.
This isn’t guaranteed to work, as it depends on the shape of the original course, but it is a good option for getting a better map scale.
If you specify A3 paper with this option then the resulting map will be printed on two A3 sheets.
Course Evolution Preferences
These control the behaviour of the genetic algorithm itself when it is generating a course.

Stopping Criteria
Three settings are available to control the stopping criteria of the genetic algorithm. The first one to be reached will terminate the course evolution.
Max Execution Time
How long, in seconds, the genetic algorithm should run before it is terminated.
Max Number of Generations
How many generations the genetic algorithm should evaluate before it is terminated.
Fitness Stop Level
The fitness of the best course found so far is compared to this value. If the fitness is greater than this value, the genetic algorithm is terminated.
GA Parameters
See the Jenetics documentation for more information.
Swap Probability
The probability that a swap mutation will occur for a pair of courses. I.e. some legs on one course will be swapped with legs on the other course.
Mutation Probability
The probability that a mutation will occur (i.e. a new, different, control site will be found) for a control on a course.
Max Phenotype Age
How long an individual candidate course should survive before it is replaced by a new candidate course.
Offspring Fraction
The fraction of the population that should be carried over into the next generation.
Population Size
The number of candidate courses that should be evaluated in each generation.
Control Replacement Factors
Allowed Mutation Radius
The radius, in metres, of the circle around a control site that the algorithm will look for an alternate feature in when mutating a given control